All posts in " strimzi "

ASAP! – The Storified Demo of Introduction to Debezium and Kafka on Kubernetes

A few days ago, I had a chance to speak about “Change Data Capture with Debezium and Apache Kafka” at an Istanbul Java User Group event. After the presentation, I did a small demo that I think was very beneficial for the audience so I thought that it would be best to improve it and kind of “storify” it in order to have both fun and spread it to a wider audience. So here is the demo, and here are the resources that you might need. Enjoy:)

Prerequisites

Install the required tools

  • Strimzi Kafka CLI:

sudo pip install strimzi-kafka-cli

  • oc or kubectl
  • helm

Login to a Kubernetes or OpenShift cluster and create a new namespace/project.

Let’s say we create a namespace called debezium-demo by running the following command on OpenShift:

oc new-project debezium-demo

Install demo application ‘The NeverEnding Blog’

Clone the repository:

git clone https://github.com/mabulgu/the-neverending-blog.git> Checkout the debezium-demo branch:

git checkout debezium-demo

Go into the application directory:

cd the-neverending-blog

Install the helm template:

helm template the-neverending-blog chart | oc apply -f - -n debezium-demo

Start the s2i build for the application:

oc start-build neverending-blog --from-dir=. -n debezium-demo

…and OpenShift will take care of the rest and you should have a blog application called ‘The NeverEnding Blog’ in the end:

Install Elasticsearch

Apply Elasticsearch resources to OpenShift:

oc apply -f resources/elasticsearch.yaml -n debezium-demo

Expose the route for Elasticsearch:

oc expose svc elasticsearch-es-http -n debezium-demo

By clicking on the route of the application in the browser you should see a page like this:

And for the overall applications before the demo you should be having something like this (OpenShift Developer Perspective is used here):

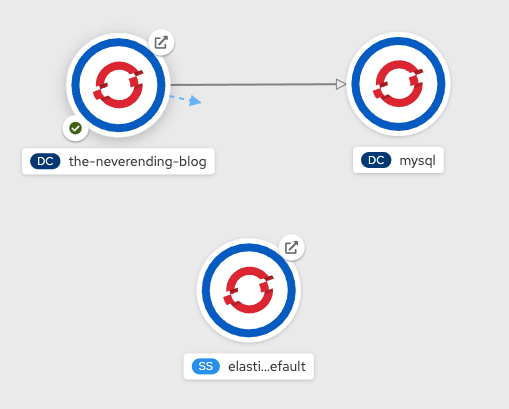
So you should have a Django application which uses a MySQL database and an Elasticsearch that has no data connection to the application -yet:)

ASAP!

So you are working at a company called NeverEnding Inc. as a Software Person and you are responsible for the company’s blog application which runs on Django and use MYSQL as a database.

One day your boss comes and tells you this:

So getting the command from your boss, you think that this is a good use case for using Change Data Capture (CDC) pattern.

Since the boss wants it ASAP, and you don’t want to make dual writes which may cause consistency problems, you have to find a way to apply this request easily and you think it will be best to implement it via Debezium on your OpenShift Office Space cluster along with Strimzi: Kafka on Kubernetes.

Oh, you can wear a Hawaiian shirt and jeans while you are doing all these even if it’s not Friday:)

Deploying a Kafka cluster with Strimzi Kafka CLI

In order to install Strimzi cluster on OpenShift you decide to use Strimzi Kafka CLI which you can also install the cluster operator of it.

First install the Strimzi operator:

kfk operator --install -n debezium-demo

IMPORTANT

If you have already an operator installed, please check the version. If the Strimzi version you’ve been using is older than 0.20.0, you have to set the right version as an environment variable, so that you will be able to use the right version of cluster custom resource.

export STRIMZI_KAFKA_CLI_STRIMZI_VERSION=0.19.0

Let’s create a Kafka cluster called demo on our OpenShift namespace debezium-demo.

kfk clusters --create --cluster demo -n debezium-demo

In the opened editor you may choose 3 broker, 3 zookeeper configuration which is the default. So after saving the configuration file of the Kafka cluster in the developer preview of OpenShift you should see the resources that are created for the Kafka cluster:

Deploying a Kafka Connect Cluster for Debezium

Now it’s time to create a Kafka Connect cluster via using Strimzi custom resources. Since Strimzi Kafka CLI is not capable of creating connect objects yet at the time of writing this article we will create it by using the sample resources in the demo project.

Create a custom resource like the following:

apiVersion: kafka.strimzi.io/v1beta1
kind: KafkaConnect
metadata:
  annotations:
    strimzi.io/use-connector-resources: 'true'
  name: debezium
spec:
  bootstrapServers: 'demo-kafka-bootstrap:9092'
  config:
    config.storage.replication.factor: '1'
    config.storage.topic: debezium-cluster-configs
    group.id: debezium-cluster
    offset.storage.replication.factor: '1'
    offset.storage.topic: debezium-cluster-offsets
    status.storage.replication.factor: '1'
    status.storage.topic: debezium-cluster-status
  image: 'quay.io/hguerreroo/rhi-cdc-connect:2020-Q3'
  jvmOptions:
    gcLoggingEnabled: false
  replicas: 1
  resources:
    limits:
      memory: 2Gi
    requests:
      memory: 2Gi

And apply it to OpenShift debezium-demo namespace (or just apply the one you have in this demo repository)

oc apply -f resources/kafka-connect-debezium.yaml -n debezium-demo

This will create a Kafka Connect cluster with the name debezium on your namespace:

Deploy a Debezium connector for MySQL

So you have the Kafka Connect cluster to be able to use with Debezium. Now it’s time for the real magic; the Debezium connector for MySQL.

Create the custom resource like the following, by noticing the parts of configuration starts with database.

Since you have to capture the changes in the neverendingblog database which has the posts database your configuration should be something like this:

apiVersion: kafka.strimzi.io/v1alpha1
kind: KafkaConnector
metadata:
  labels:
    strimzi.io/cluster: debezium
  name: debezium-mysql-connector
spec:
  class: io.debezium.connector.mysql.MySqlConnector
  config:
    database.server.name: db
    database.hostname: mysql
    database.user: debezium
    database.password: dbz
    database.server.id: '184054'
    database.port: '3306'
    database.dbname: neverendingblog
    database.history.kafka.topic: db.history
    database.history.kafka.bootstrap.servers: 'demo-kafka-bootstrap:9092'
  tasksMax: 1

Apply this YAML by saving it or just run the following command in this repository:

oc apply -f resources/kafka-connector-mysql-debezium.yaml -n debezium-demo

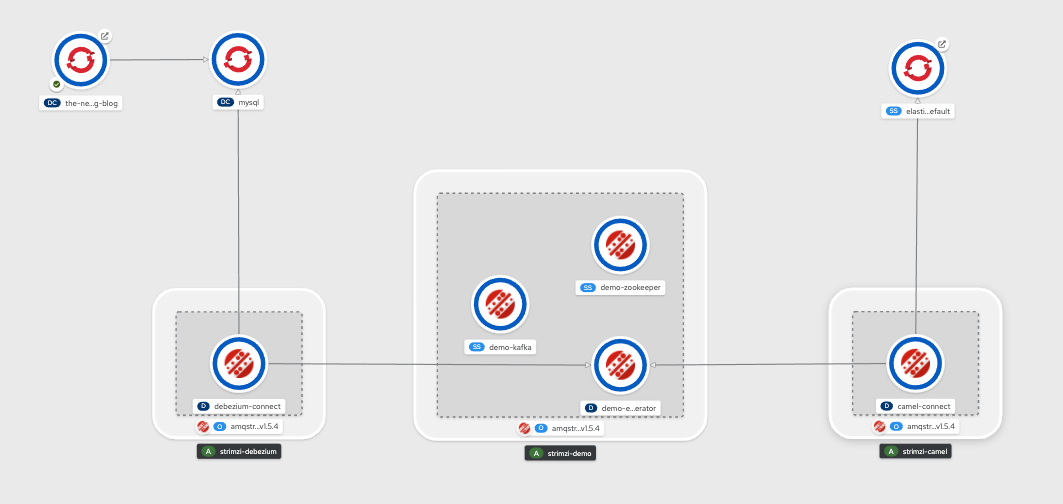
So you should now have some action in your Kafka cluster by now and the big picture should look like this:

In order to see if there is any new topic is created in your Kafka cluster run this command to list the topics in the debezium-demo namespace and demo Kafka cluster:

kfk topics --list -n debezium-demo -c demo

So you should see some topics are created for you:

NAME                                                                                PARTITIONS   REPLICATION FACTOR
consumer-offsets---84e7a678d08f4bd226872e5cdd4eb527fadc1c6a                         50           1
db                                                                                  1            1
db.history                                                                          1            1
db.neverendingblog.auth-permission---68ff3df4ec8e6a44b01288a87974b27990a559d2       1            1
db.neverendingblog.auth-user---a76d163ac9b98b60f06bfda76e966523ee9ffad              1            1
db.neverendingblog.django-admin-log---889a02bc079f08f8adf60c1b1f1cc6782dd99531      1            1
db.neverendingblog.django-content-type---79cc865eac5ac5b439174d2165a8035d52062610   1            1
db.neverendingblog.django-migrations---adc510d5c63e7b6ccbbf460dfa8c03408559591d     1            1
db.neverendingblog.django-session---38f5de04ea83f7a9add8be00a2d695a9503505c6        1            1
db.neverendingblog.posts                                                            1            1
debezium-cluster-configs                                                            1            1
debezium-cluster-offsets                                                            25           1
debezium-cluster-status                                                             5            1

Now let’s check this connector works or not. So start a consumer that listens your db.neverendingblog.posts topic which the captured data from posts topic is put.

kfk console-consumer --topic db.neverendingblog.posts -n debezium-demo -c demo

After starting the consumer let’s make some changes in the NeverEnding Blog. Open the Django admin page by getting the route URL of the blog and putting a “/admin” at the end.


INFO

You can get the route URL of your application with the following command:

oc get routes -n debezium-demo

So login to the admin page with the credentials mabulgu/123456 and click on Posts and add a new one by clicking Add Post and put these values as a test and save it:

In the consumer you must already have seen a move right? Copy that into a JSON beautifier and see what you have. You must have something like this:

{
  "schema": {
    "type": "struct",
    "fields": [
      {
        "type": "struct",
        "fields": [
          {
            "type": "int32",
            "optional": false,
            "field": "id"
          },
          {
            "type": "string",
            "optional": false,
            "field": "title"
          },
          {
            "type": "string",
            "optional": false,
            "field": "text"
          },
          {
            "type": "int64",
            "optional": false,
            "name": "io.debezium.time.MicroTimestamp",
            "version": 1,
            "field": "created_date"
          },
          {
            "type": "int64",
            "optional": true,
            "name": "io.debezium.time.MicroTimestamp",
            "version": 1,
            "field": "published_date"
          },
          {
            "type": "int32",
            "optional": false,
            "field": "author_id"
          }
        ],
        "optional": true,
        "name": "db.neverendingblog.posts.Value",
        "field": "before"
      },
      {
        "type": "struct",
        "fields": [
          {
            "type": "int32",
            "optional": false,
            "field": "id"
          },
          {
            "type": "string",
            "optional": false,
            "field": "title"
          },
          {
            "type": "string",
            "optional": false,
            "field": "text"
          },
          {
            "type": "int64",
            "optional": false,
            "name": "io.debezium.time.MicroTimestamp",
            "version": 1,
            "field": "created_date"
          },
          {
            "type": "int64",
            "optional": true,
            "name": "io.debezium.time.MicroTimestamp",
            "version": 1,
            "field": "published_date"
          },
          {
            "type": "int32",
            "optional": false,
            "field": "author_id"
          }
        ],
        "optional": true,
        "name": "db.neverendingblog.posts.Value",
        "field": "after"
      },
      {
        "type": "struct",
        "fields": [
          {
            "type": "string",
            "optional": false,
            "field": "version"
          },
          {
            "type": "string",
            "optional": false,
            "field": "connector"
          },
          {
            "type": "string",
            "optional": false,
            "field": "name"
          },
          {
            "type": "int64",
            "optional": false,
            "field": "ts_ms"
          },
          {
            "type": "string",
            "optional": true,
            "name": "io.debezium.data.Enum",
            "version": 1,
            "parameters": {
              "allowed": "true,last,false"
            },
            "default": "false",
            "field": "snapshot"
          },
          {
            "type": "string",
            "optional": false,
            "field": "db"
          },
          {
            "type": "string",
            "optional": true,
            "field": "table"
          },
          {
            "type": "int64",
            "optional": false,
            "field": "server_id"
          },
          {
            "type": "string",
            "optional": true,
            "field": "gtid"
          },
          {
            "type": "string",
            "optional": false,
            "field": "file"
          },
          {
            "type": "int64",
            "optional": false,
            "field": "pos"
          },
          {
            "type": "int32",
            "optional": false,
            "field": "row"
          },
          {
            "type": "int64",
            "optional": true,
            "field": "thread"
          },
          {
            "type": "string",
            "optional": true,
            "field": "query"
          }
        ],
        "optional": false,
        "name": "io.debezium.connector.mysql.Source",
        "field": "source"
      },
      {
        "type": "string",
        "optional": false,
        "field": "op"
      },
      {
        "type": "int64",
        "optional": true,
        "field": "ts_ms"
      },
      {
        "type": "struct",
        "fields": [
          {
            "type": "string",
            "optional": false,
            "field": "id"
          },
          {
            "type": "int64",
            "optional": false,
            "field": "total_order"
          },
          {
            "type": "int64",
            "optional": false,
            "field": "data_collection_order"
          }
        ],
        "optional": true,
        "field": "transaction"
      }
    ],
    "optional": false,
    "name": "db.neverendingblog.posts.Envelope"
  },
  "payload": {
    "before": null,
    "after": {
      "id": 3,
      "title": "Javaday Istanbul 2020",
      "text": "It was perfect as always!",
      "created_date": 1606400139000000,
      "published_date": null,
      "author_id": 1
    },
    "source": {
      "version": "1.2.4.Final-redhat-00001",
      "connector": "mysql",
      "name": "db",
      "ts_ms": 1606400180000,
      "snapshot": "false",
      "db": "neverendingblog",
      "table": "posts",
      "server_id": 223344,
      "gtid": null,
      "file": "mysql-bin.000003",
      "pos": 27078,
      "row": 0,
      "thread": 221,
      "query": null
    },
    "op": "c",
    "ts_ms": 1606400180703,
    "transaction": null
  }
}

So congratulations! You can capture changes on your neverendingblog database.

But your boss still wants you to put these changes on your search system Elasticsearch.

Before rolling the sleeves to send this change data to Elasticsearch let’s purify this data since all you need to index is the operation type and the table fields in this Debezium JSON data.

Simple Data Transformation

So in order to transform the data some key/value converters has to be set in order to do extract transformation which will create a different data model in the end.

So add these lines and apply it on your OpenShift cluster:

    key.converter: org.apache.kafka.connect.json.JsonConverter
    key.converter.schemas.enable: 'false'
    value.converter: org.apache.kafka.connect.json.JsonConverter
    value.converter.schemas.enable: 'false'
    transforms: extract
    transforms.extract.add.fields: 'op,table'
    transforms.extract.type: io.debezium.transforms.ExtractNewRecordState

Or just run this sample in the repository:

oc apply -f resources/kafka-connector-mysql-debezium_transformed.yaml -n debezium-demo

This means that we will extract the data for op and table fields and create a new JSON to be returned.

After applying the changes let’s consume the messages again if we did stop the consumer already:

kfk console-consumer --topic db.neverendingblog.posts -n debezium-demo -c demo

Go to the blog admin page again but this time let’s change one of the blog posts instead of adding one.

Edit the post titled Strimzi Kafka CLI: Managing Strimzi in a Kafka Native Way and put a “CHANGED -” at the very start of the body for example.

When you change the data, a relatively smaller JSON data must have been consumed in your console, something like this:

{
  "id": 2,
  "title": "Strimzi Kafka CLI: Managing Strimzi in a Kafka Native Way",
  "text": "CHANGED - Strimzi Kafka CLI is a CLI that helps traditional Apache Kafka users -mostly administrators- to easily adapt Strimzi, a Kubernetes operator for Apache Kafka.\r\n\r\nIntention here is to ramp up Strimzi usage by creating a similar CLI experience with traditional Apache Kafka binaries. \r\n\r\nkfk command stands for the usual kafka-* prefix of the Apache Kafka runnable files which are located in bin directory. There are options provided like topics, console-consumer, etc. which also mostly stand for the rest of the runnable file names like kafka-topic.sh.\r\n\r\nHowever, because of the nature of Strimzi and its capabilities, there are also unusual options like clusters which is used for cluster configuration or users which is used for user management and configuration.",
  "created_date": 1594644431000000,
  "published_date": 1594644489000000,
  "author_id": 1,
  "__op": "u",
  "__table": "posts"
}

So this will be the data that you will index in Elasticsearch. Now let’s go for it!

Deploying a Kafka Connect Cluster for Camel

In order to use another connector that consumes the data from Kafka and puts it onto Elasticsearch, first we need another Kafka Connect cluster, this time for a Camel connector.

apiVersion: kafka.strimzi.io/v1beta1
kind: KafkaConnect
metadata:
  annotations:
    strimzi.io/use-connector-resources: 'true'
  name: camel
spec:
  bootstrapServers: 'demo-kafka-bootstrap:9092'
  config:
    config.storage.replication.factor: '1'
    config.storage.topic: camel-cluster-configs
    group.id: camel-cluster
    offset.storage.replication.factor: '1'
    offset.storage.topic: camel-cluster-offsets
    status.storage.replication.factor: '1'
    status.storage.topic: camel-cluster-status
  image: 'quay.io/hguerreroo/camel-kafka-connect:0.5.0'
  jvmOptions:
    gcLoggingEnabled: false
  replicas: 1
  resources:
    limits:
      memory: 2Gi
    requests:
      memory: 2Gi

Saving or apply this YAML to your OpenShift namespace or just simply run this sample:

oc apply -f resources/kafka-connect-camel.yaml -n debezium-demo

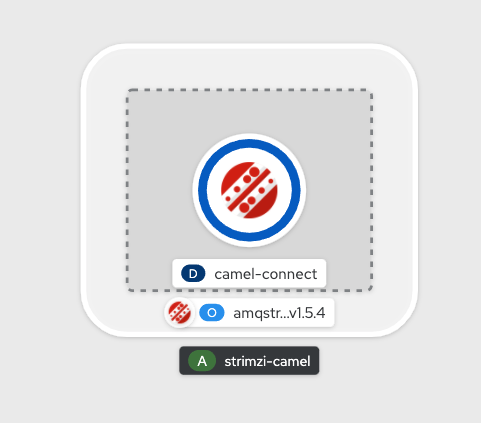
This will create a Kafka Connect cluster with the name camel on your namespace:

Now let’s put some connector on this connect cluster.

Deploy a Camel Sink connector for Elasticsearch

In order to send the consumed data to Elasticsearch we can use Apache Camel project’s connectors for Kafka Connect.

The following is a sample of an Elasticsearch Sink Connector of Camel, which takes Kafka as the source and Elasticsearch as the sink.

apiVersion: kafka.strimzi.io/v1alpha1
kind: KafkaConnector
metadata:
  labels:
    strimzi.io/cluster: camel
  name: elasticsearch-connector
spec:
  class: >-
    org.apache.camel.kafkaconnector.elasticsearchrest.CamelElasticsearchrestSinkConnector
  config:
    camel.sink.endpoint.hostAddresses: 'elasticsearch-es-http:9200'
    camel.sink.endpoint.indexName: posts
    camel.sink.endpoint.operation: Index
    camel.sink.path.clusterName: elasticsearch
    key.converter: org.apache.kafka.connect.storage.StringConverter
    value.converter: org.apache.kafka.connect.storage.StringConverter
    topics: db.neverendingblog.posts
  tasksMax: 1

By saving and applying this resource you tell the connect cluster that consume the db.neverendingblog.posts topic of Kafka, and put them in a posts index in Elasticsearch.

Or just run this command to create the connector:

oc apply -f resources/kafka-connector-elastic-camel.yaml -n debezium-demo

Now the big picture should look like this:

So let’s test your Elasticsearch running some curls as a search request.

Try out Elasticsearch

For Elasticsearch, just like other applications in OpenShift in order to access it externally, you should get its route with the command:

oc get routes -n debezium-demo

Let’s say that we get the route as http://elasticsearch-es-http-debezium-demo.apps.cluster-jdayist-6d29.jdayist-6d29.example.opentlc.com.

So in order to see if the index is created or if it has anything inside, just run the following command for searching everything in the index:

curl -X GET \
  http://elasticsearch-es-http-debezium-demo.apps.cluster-jdayist-6d29.jdayist-6d29.example.opentlc.com/posts/_search

You should get a response that has all the changes including the one for Javaday Istanbul. So let’s see if we can find it or not:

curl -X GET \
  'http://elasticsearch-es-http-debezium-demo.apps.cluster-jdayist-6d29.jdayist-6d29.example.opentlc.com/posts/_search?q=title:Javaday%20Istanbul%202020'

So you should see somethinhg like this in return:

{
    "took": 8,
    "timed_out": false,
    "_shards": {
        "total": 1,
        "successful": 1,
        "skipped": 0,
        "failed": 0
    },
    "hits": {
        "total": {
            "value": 1,
            "relation": "eq"
        },
        "max_score": 4.852654,
        "hits": [
            {
                "_index": "posts",
                "_type": "_doc",
                "_id": "8VI-FnYBP8VChxowl2Pr",
                "_score": 4.852654,
                "_source": {
                    "id": 3,
                    "title": "Javaday Istanbul 2020",
                    "text": "It was perfect as always!",
                    "created_date": 1606690949000000,
                    "published_date": null,
                    "author_id": 1,
                    "__op": "c",
                    "__table": "posts"
                }
            }
        ]
    }
}

Congratulations! You finished it ASAP! Now you can relax and may feel a little bit like a gansta:)

By the way, if you are interested in the event presentation and the demo video, here it is! (p.s. Event was in Turkish)

Continue reading >
Share

Bootstrap Kafka on Kubernetes (Strimzi) with Just 5 Commands

1 – Install Strimzi Kafka CLI

sudo pip install strimzi-kafka-cli

2 – Create project namespace on Openshift/Kubernetes

oc new-project kafka

3 – Install Strimzi Kafka Operator

kfk operator --install -n kafka

4 – Create Kafka Cluster

kfk clusters --create --cluster my-cluster -n kafka

5 – Create a Kafka topic

kfk topics --create --topic my-topic --partitions 12 --replication-factor 3 -n kafka -c my-cluster

Let’s try it out!

kfk console-producer --topic my-topic -n kafka -c my-cluster
kfk console-consumer --topic my-topic -n kafka -c my-cluster

Special thanks to Timecop1983 for the great music!

Continue reading >
Share

Simple ACL Authorization on Strimzi using Strimzi Kafka CLI

Simple ACL Authorization

In the previous example we implemented TLS authentication on Strimzi Kafka cluster with Strimzi Kafka CLI. In this example, we will be continuing with enabling the ACL authorization, so that we will be able to restrict access to our topics and only allow the users or groups we want to.

Let's first see our cluster list.

kfk clusters --list
NAMESPACE    NAME              DESIRED KAFKA REPLICAS   DESIRED ZK REPLICAS
kafka        my-cluster        3                        3

IMPORTANT

You should have a cluster called my-cluster on the namespace kafka we created before. If you don't have the cluster and haven't yet done the authentication part please go back to the previous example and do it first since for authorization you will need authentication to be set up before.

Also please copy the truststore.jks and the user.p12 files or recreate them as explained in the previous example and put it along the example folder which we ignore in git.


Considering you have the cluster my-cluster on namespace kafka, let's list our topics to see the topic we created before:

kfk topics --list -n kafka -c my-cluster
NAME                                                          PARTITIONS   REPLICATION FACTOR
consumer-offsets---84e7a678d08f4bd226872e5cdd4eb527fadc1c6a   50           3
my-topic                                                      12           3

Lastly let's list our user that we created previously, which we will be setting the authorization for.

kfk users --list -n kafka -c my-cluster
NAME      AUTHENTICATION   AUTHORIZATION
my-user   tls

As you can see we have the my-user user that we created and authenticated in the previous example.

Now let's configure our cluster to enable for ACL authorization. We have to alter our cluster for this:

kfk clusters --alter --cluster my-cluster -n kafka

and put the simple authorization definitions under kafka like the following:

authorization:
  type: simple

After saving the cluster configuration wait for the brokers to be rolling updated by checking their status:

watch kubectl get pods -n kafka

Now it's time to run the producer and consumer to check if authorization is enabled:

kfk console-producer --topic my-topic -n kafka -c my-cluster --producer.config client.properties
ERROR Error when sending message to topic my-topic with key: null, value: 4 bytes with error: (org.apache.kafka.clients.producer.internals.ErrorLoggingCallback)
org.apache.kafka.common.errors.TopicAuthorizationException: Not authorized to access topics: [my-topic]
kfk console-consumer --topic my-topic -n kafka -c my-cluster --consumer.config client.properties
ERROR Error processing message, terminating consumer process:  (kafka.tools.ConsoleConsumer$)
org.apache.kafka.common.errors.TopicAuthorizationException: Not authorized to access topics: [my-topic]
Processed a total of 0 messages

As you might also observe, both the producer and consumer returned TopicAuthorizationException by saying Not authorized to access topics: [my-topic]. So let's define authorization access to this topic for the user my-user.

In order to enable user's authorization, we have to both define the user's authorization type as simple for it to use SimpleAclAuthorizer of Apache Kafka, and the ACL definitions for the relevant topic -in this case it is my-topic. To do this, we need to alter the user with the following command options:

kfk users --alter --user my-user --authorization-type simple --add-acl --resource-type topic --resource-name my-topic -n kafka -c my-cluster

The --add-acl option requires arguments like:


--operation TEXT                Operation that is being allowed or denied.
                                  (default: All)

--host TEXT                     Host which User will have access. (default:
                              *)

--type [allow|deny]             Operation type for ACL. (default: allow)
--resource-type TEXT            This argument is mutually inclusive with
                              ['add_acl', 'delete_acl']

--resource-name TEXT            This argument is mutually inclusive with
                              ['add_acl', 'delete_acl']

In this example we only used --resource-type and --resource-name since those are the required fields and others have some defaults that we could use.

So in this case we used the defaults of type:allow, host:* and operation:All. The equal command should look like this:

kfk users --alter --user my-user --authorization-type simple --add-acl --resource-type topic --resource-name my-topic --type allow --host * --operation All -n kafka -c my-cluster

In order to see the ACL that is defined for allowing all operations of my-topic for the user my-user, let's describe it, in this case as YAML format:

kfk users --describe --user my-user -n kafka -c my-cluster -o yaml
apiVersion: kafka.strimzi.io/v1beta1
kind: KafkaUser
metadata:
...
spec:
  authentication:
    type: tls
  authorization:
    type: simple
    acls:
    - host: '*'
      operation: All
      resource:
        name: my-topic
        patternType: literal
        type: topic
      type: allow
status:
...

As you can see the user has the authorization defined as simple and ACL that allows all (read, write, describe) access for my-topic from this user.

Now with the updated configuration let's run our producer and consumer again:

kfk console-producer --topic my-topic -n kafka -c my-cluster --producer.config client.properties
>message1
>message2
>message3
>

It seems that we are able to produce messages to my-topic. Let's consume those messages then:

kfk console-consumer --topic my-topic -n kafka -c my-cluster --consumer.config client.properties
ERROR Error processing message, terminating consumer process:  (kafka.tools.ConsoleConsumer$)
org.apache.kafka.common.errors.GroupAuthorizationException: Not authorized to access group: console-consumer-96150
Processed a total of 0 messages

Whoops! It did not work like the producer. But why? Because the consumer group that is randomly generated for us (because we did not define it anywhere) doesn't have at least read permission on my-topic topic.


IMPORTANT

In Apache Kafka, if you want to consume messages you have to do it via a consumer group. You might say that "we did not specify any consumer group while using the console consumer". Well just like the traditional console consumer of Kafka, it uses a randomly created consumer group id so you have a consumer group but it is created for you (like the one above as console-consumer-96150) since we did not define one previously.


Ok then. Now let's add the ACL for a group in order to give read permission for my-topic topic. Let's call this group my-group, which we will also use it as the group id in our consumer client configuration. This time let's use kfk acls command which works like kfk users --alter --add-acl command. In order to give the best traditional experience to Strimzi CLI users, just like the traditional bin/kafka-acls.sh command, we have the kfk acls command which works mostly the same with the traditional one.

With the following command, we give the my-group group the read right for consuming the messages.

kfk acls --add --allow-principal User:my-user --group my-group --operation Read -n kafka -c my-cluster

After adding the ACL, let's check whether our user has the ACL for the group or not:

kfk users --describe --user my-user -n kafka -c my-cluster -o yaml

In the acls section of the YAML you can see the entries are added:

    - host: '*'
      operation: Read
      resource:
        name: my-group
        patternType: literal
        type: group
      type: allow

You can list the ACLs with the following command as well which lists all the ACLs Kafka natively:

kfk acls --list -n kafka -c my-cluster
Current ACLs for resource `ResourcePattern(resourceType=GROUP, name=my-group, patternType=LITERAL)`:
 	(principal=User:CN=my-user, host=*, operation=READ, permissionType=ALLOW)

Current ACLs for resource `ResourcePattern(resourceType=TOPIC, name=my-topic, patternType=LITERAL)`:
 	(principal=User:CN=my-user, host=*, operation=ALL, permissionType=ALLOW)

Or you can list topic and group ACLs seperately:

kfk acls --list --topic my-topic -n kafka -c my-cluster
Current ACLs for resource `ResourcePattern(resourceType=TOPIC, name=my-topic, patternType=LITERAL)`:
 	(principal=User:CN=my-user, host=*, operation=ALL, permissionType=ALLOW)

For the group ACLs:

kfk acls --list --group my-group -n kafka -c my-cluster
Current ACLs for resource `ResourcePattern(resourceType=GROUP, name=my-group, patternType=LITERAL)`:
 	(principal=User:CN=my-user, host=*, operation=READ, permissionType=ALLOW)

The only thing we have to do right now is to put the group id definition in our client.properties file:

security.protocol=SSL
ssl.truststore.location=./truststore.jks
ssl.truststore.password=123456
ssl.keystore.location=./user.p12
ssl.keystore.password=123456
group.id=my-group

Running the consumer again with the updated client configuration -this time consuming from the beginning- let's see the previously produced logs:

kfk console-consumer --topic my-topic -n kafka -c my-cluster --consumer.config client.properties --from-beginning
message1
message2
message3

Voilà!

We are able to configure the Strimzi cluster for ACL authorization, define ACLs easily with different methods and use the client configurations successfully with Strimzi Kafka CLI.

Access the repo of this post from here: https://github.com/systemcraftsman/strimzi-kafka-cli/tree/master/examples/3_simple_acl_authorization

If you are interested more, you can have a look at the short video where I explain the Simple ACL authorization example here:

Take care👋

Continue reading >
Share

TLS Authentication on Strimzi by using Strimzi Kafka CLI

TLS Authentication

In this example we will demonstrate setting up TLS authentication for Strimzi using Strimzi Kafka CLI. So let's get started!

First lets list the clusters and see our clusters list.

kfk clusters --list

IMPORTANT

If you don't have any Kafka cluster that is created on your OpenShift/Kubernetes, pls. see the Strimzi Quick Start document or simply use:

kfk clusters --create --cluster my-cluster -n kafka

Assuming we have a cluster called my-cluster already set up for us let's list the topics in the cluster

kfk topics --list -n kafka -c my-cluster

If it is a new cluster probably there is no topic living in the cluster yet. So let's create a new topic for our example.

Create a topic called my-topic with 12 partitions and replication factor 3 in my-cluster cluster

kfk topics --create --topic my-topic --partitions 12 --replication-factor 3 -n kafka -c my-cluster

Run console producer to produce messages to my-topic

kfk console-producer --topic my-topic -n kafka -c my-cluster

Run console consumer to consume messages from my-topic

kfk console-consumer --topic my-topic -n kafka -c my-cluster

After being sure to produce and consume messages without a problem, now lets enable the authentication for TLS. In Strimzi, if you want to enable authentication, there are listeners configurations that provides a couple of authentication methodologies like scram-sha-512, oauth and tls.

In order to enable the authentication we have to alter our Kafka cluster:

kfk clusters --alter --cluster my-cluster -n kafka

An editor will be opened in order to change the Strimzi Kafka cluster configuration. Since Strimzi Kafka cluster resource has many items inside, for now, we don’t have any special property flag in order to directly set the value while altering. That’s why we only open the cluster custom resource available for editing.

In the opened editor we have to add the following listeners as:

listeners:
  plain: {}
  tls:
    authentication:
      type: tls

If you want to fully secure your cluster you have to also change the plain listener for authentication, because with the upper configuration unless we use a client configuration that doesn’t use SSL security protocol it will use the plain one which doesn’t require any authentication. In order to do that, we can tell the plain listener in cluster config to use one of the authentication methodologies among scram-sha-512 or oauth. In this example we will set it as scram-sha-512 but we will show the authentication via scram-sha-512 in another example.

So the latest listener definition should be like this:

listeners:
  plain:
    authentication:
      type: scram-sha-512
  tls:
    authentication:
      type: tls

Save the file and see the successfully edited message.

After the configuration change all the broker pods will be updated one by one, thanks to our operator. You can watch the pods state since we have to wait till each of them are in ready state.

watch kubectl get pods -n kafka

Now lets run our console producer and consumer again and see what happens:

kfk console-producer --topic my-topic -n kafka -c my-cluster
kfk console-consumer --topic my-topic -n kafka -c my-cluster

You got some WARN log messages saying disconnected (org.apache.kafka.clients.NetworkClient) from both producer and consumer right?

When we check the first pod logs that we ran the producer and consumer commands we can see the failed authentication message:

kubectl logs -f my-cluster-kafka-0 -c kafka -n kafka
2020-09-22 11:18:33,122 INFO [SocketServer brokerId=0] Failed authentication with /10.130.2.58 (Unexpected Kafka request of type METADATA during SASL handshake.) (org.apache.kafka.common.network.Selector) [data-plane-kafka-network-thread-0-ListenerName(PLAIN-9092)-SASL_PLAINTEXT-3]

Since we are not yet using SSL for authentication, but the PLAIN connection method, which we set up as scram-sha-512, we can not authenticate to the Strimzi Kafka cluster.

In order to login this cluster via SSL authentication we have to;

  • Create a user that uses TLS authentication
  • Create truststore and keystore files by getting the certificates from Openshift/Kubernetes cluster
  • Create a client.properties file that is to be used by producer and consumer clients in order to be able to authenticate via TLS

Let's first create the user with the name my-user:

kfk users --create --user my-user --authentication-type tls -n kafka -c my-cluster

After creating the user let's describe it to view a few attributes:

kfk users --describe --user my-user -n kafka -c my-cluster

At the bottom of the details of the user; in the status section, you can see a secret and a username definition:

Name:         my-user
Namespace:    kafka
Labels:       strimzi.io/cluster=my-cluster
Annotations:  <none>
API Version:  kafka.strimzi.io/v1beta1
Kind:         KafkaUser
Metadata:
  Creation Timestamp:  2020-09-21T12:54:52Z
  Generation:          3
  Resource Version:    53996010
  Self Link:           /apis/kafka.strimzi.io/v1beta1/namespaces/kafka/kafkausers/my-user
  UID:                 1c1dad0c-4e7a-4e63-933c-a785e6941021
Spec:
  Authentication:
    Type:  tls
Status:
  Observed Generation:     3
  Secret:                  my-user
  Username:                CN=my-user
Events:                    <none>

This means that a secret named my-user is created for this user and with the username CN=my-user as a common name definition.

In the secrets there are private and public keys that should be imported in the truststore and the keystore files that will be created shortly.

kubectl describe secret/my-user -n kafka
Name:         my-user
Namespace:    kafka
Labels:       app.kubernetes.io/instance=my-user
              app.kubernetes.io/managed-by=strimzi-user-operator
              app.kubernetes.io/name=strimzi-user-operator
              app.kubernetes.io/part-of=strimzi-my-user
              strimzi.io/cluster=my-cluster
              strimzi.io/kind=KafkaUser
Annotations:  <none>

Type:  Opaque

Data
====
ca.crt:         1164 bytes
user.crt:       1009 bytes
user.key:       1704 bytes
user.p12:       2364 bytes
user.password:  12 bytes

In order create the truststore and keystore files just run the get_keys.sh file in the example directory:

chmod a+x ./get_keys.sh;./get_keys.sh

This will generate two files:

  • truststore.jks for the client's truststore definition
  • user.p12 for the client's keystore definition

TLS authentications are made with bidirectional TLS handshake. In order to do this apart from a truststore that has the public key imported, a keystore file that has both the public and private keys has to be created and defined in the client configuration file.

So let's create our client configuration file.

Our client configuration should have a few definitions like:

  • Security protocol
  • Truststore location and password
  • Keystore location and password

Security protocol should be SSL and since the truststore and keystore files are located in the example directory the client config file should be something like this:

security.protocol=SSL
ssl.truststore.location=./truststore.jks
ssl.truststore.password=123456
ssl.keystore.location=./user.p12
ssl.keystore.password=123456

Since the get_keys.sh script sets the store passwords as 123456 we use it in the config file.

Save it as client.properties (or just use the one that is already created in this directory with the name client.properties)

Now it's time to test it. Let's call the console producer and consumer again, but this time with the client configuration:


IMPORTANT

Be careful to run producer and consumer commands from example's directory. Otherwise you have to change the truststore and keystore paths in the client.properties file.


kfk console-producer --topic my-topic -n kafka -c my-cluster --producer.config client.properties

The console producer seems to be working just fine since we can produce messages.

>message1
>message2
>message3
>

Let's run the console consumer to consume the just produced messages:

kfk console-consumer --topic my-topic -n kafka -c my-cluster --consumer.config client.properties
message1
message2
message3

Worked like a charm!

We are able to configure the Strimzi cluster and use the client configurations for TLS authentication easily with Strimzi Kafka CLI.

Access the repo of this post from here: https://github.com/systemcraftsman/strimzi-kafka-cli/tree/master/examples/2_tls_authentication

If you are interested more, you can have a look at the short video that I explain the TLS authentication example here:

Take care👋

Continue reading >
Share

Strimzi Kafka CLI: Managing Strimzi in a Kafka Native Way

Apache Kafka today, is a popular distributed streaming technology providing pub/sub mechanism, storing, and processing streams in a distributed way.

As Kubernetes becomes more and more popular day by day, it is inevitable for a technology like Apache Kafka to run on Kubernetes platform natively. Using some capabilities of Kubernetes like Operator Framework or Statefulsets, a group of people from Red Hat, started an open-source community project called Strimzi which is one of the most popular and reliable Kubernetes operators as a CNCF sandbox project.

It has been almost a year since I gave a speech about Strimzi with the topic “Strimzi: Distributed Streaming with Apache Kafka in Kubernetes” at Istanbul JUG community. Since then a lot has been changed both in the Apache Kafka and the Strimzi world. Zookeeper has now TLS support, and Strimzi is improved with many features like SCRAM-SHA authentication, MirrorMaker2, and many more. Strimzi is more powerful now and this -as the upstream project- is what makes Red Hat AMQ Streams stronger.

Besides many features and improvements on Strimzi aka. (Strimzi Kafka Operator), today I want to introduce you to a tool that I’ve been working on for a while, aiming of making traditional Apache Kafka administrators’ or developers’ life easier while using Kubernetes-Cloud Native Kafka: Strimzi. But before that, let me tell you my short story about meeting with Kafka and Strimzi and experiences afterward. Don’t worry, we will come to a point:)

Meeting Apache Kafka

It was a few years ago I was working as a developer at sahibinden.com a classified ad and e-commerce company. At Sahibinden, we welcomed very high numbers of concurrent visitors at that time including the ones who are not logged in. One of the biggest challenges was actually this because one can surf through all the site content anonymously and do any actions with the classified ads, and other components by viewing details, clicking, etc. And my Apache Kafka journey began with one of those challenges.

The job was: each classified ad visit had to be saved to a list that had to be created for each user -including the anonymous ones- as Last Visited Classified Ads. Before that project, I had no idea of any messaging technology, and its usage or their differences. Kafka had been used for a time in the company and architects had already decided what technology to use for that kind of project. So by getting the basic info and discussing the architecture with the fellow architects I started the project. I won’t go in details but the structure was roughly this: when a user visits a classified ad, put it into a Kafka topic, then consume it to save it into MongoDB database. Easy-peasy!

I made the first implementation. The code is reviewed, and released with the next release and BOOM! The guy form the architect/system team came to me and said something like “consumer lag”. What the hell was this consumer lag?!

I went with him to his desk to see what is happening and he wrote a couple of commands starting with “kafka-consumer-groups” and show me the offset difference for each partition per topic. I knew what a topic was but what was a partition? Did I use an ID for data consistency? What? The guy was talking like in a language that I’d never heard of.

Yeah, I have to admit that since all the code structure was ready and thought Kafka as a simple message broker without thinking about its distributed structure, I did not even move a finger to know more about Kafka itself. Anyways, the status was bad and since MongoDB could not handle too many upserts in a queue that comes from the Kafka consumers, the producer could produce data -because visitors kept visiting classified ads- but the consumer could not consume after some time because of the non-responding MongoDB.

For the “how did we solve this?” part which is not too much important for this article: We put the data to the cache, while producing it for Kafka, saved the data in bulks for each consume, and did upserts in bulks to MongoDB. And a few tweaks like changing the data retention time later.

Importance of a CLI

However, the reason behind I wanted to share with you this short story is not the solution. Apart from its being a system design problem that had to be solved, I just wanted you to notice -even if you are a very experienced person about Kafka itself- administrating and monitoring Apache Kafka is important and it has the very basic and easy to use tools bundled in itself. I am not talking about the detailed monitoring but mostly the administration itself because with just one command, having just Kafka binaries and its other relevant files itself you can do anything allowed in the whole Kafka cluster.

There are of course many tools that help people with the administration of Kafka, but it all starts with setting up the cluster and creating maybe a few topics with commands (actually sh files) that Apache Kafka provides or adding ACLs, changing topic configurations, etc. via Command Line Interface (CLI). CLIs always have been the simplest approach that holds the procedural benefits of the administration world. For the example I gave you, consumer lag check or the topic configuration changes like “log.retention.ms” were done via CLI at that time because it was the simplest, and most reliable approach while everything was on fire!

The AMQ Streams Journey

After my first interaction and stormy experience with Kafka, I did not do anything with it since I had my AMQ Streams on RHEL engagement for a customer in Red Hat, this time not as a developer, but as a consultant. That time -it has been about 1.5 years- Red Hat has this brand-new product called AMQ Streams which provided (and still provides) an enterprise-level Apache Kafka support both in RHEL (bare metal or VM) and its enterprise-level Kubernetes platform: OpenShift. While AMQ Streams on RHEL is the pure Apache Kafka that is hardened, extended, and versioned by Red Hat with full support, AMQ Streams on OpenShift is nothing but the Strimzi project which become a CNCF sandbox project in a short time successfully.

I don’t want to make a branch of this topic and steer to another one by talking about the preparation phase for the customer engagement which was tough but shortly I have to say that I learned all Kafka stuff starting with creating a topic, continuing with administration, security, and monitoring lastly in just one week! It was fun and challenging. The first phase of my customer engagement took about one week or two. It was an important customer who wanted Apache Kafka capabilities supported by a strong vendor like Red Hat because the project was a very important and vital government project.

We finished the project successfully, a couple of problems occurred when I was in London for training, but thanks to the time difference between London and Istanbul I was lucky to have a couple of extra times to discuss and solve the issue with the help of my colleagues from the support team and our Kafka and Strimzi hero Jakub Scholz from the Kafka/Strimzi engineering team.

At the end of the engagement -including the preparation phase- I -for the second time- realized Apache Kafka is a middleware that has a strong binary set as CLI that you can use both for setting up the cluster and topics, and most importantly for day-two operations.

Strimzi in Action

While playing with AMQ Streams and Kafka -because I am not only a middleware consultant but also a so-called “AppDev” consultant whose playground is OpenShift- Strimzi got my attention and started to play with it, and fall in love with it and the idea behind it: running Apache Kafka on a Kubernetes platform natively!

It used the Operator Framework which was pretty new for the Red Hat Middleware world back then (because I remember doing stuff with i.e. Infinispan/Data Grid with OpenShift templates even if there is Operator Framework. Gosh, what a struggle that was..!). The operator(s) for Strimzi managed the Kubernetes custom-resources for Kafka cluster itself, users, topics, mirroring, Kafka Connect, etc. which were bare YAML definitions. It was true magic! I had to learn about this, and I had to talk about this; show this to people. So I got my invitation from my fellows from Istanbul JUG, and did a talk about “Strimzi: Distributed Streaming with Apache Kafka in Kubernetes“. It took a little bit long but it was all fun, because most of the audience stayed till the end, and did some mind-bending conversations about messaging and Kafka.

I had this demo part at the end and while doing the demo, I realized as a traditional Apache Kafka user -which that time I could call myself so because had some real-time hands-on experience so far- changing the YAML file for a specific custom-resource for a specific configuration (for example a topic configuration) and calling oc or kubectl apply -f with that YAML file felt like it’s not accessing to Kafka or it’s not Kafka, but its something else, something different.

DevOps Transformation

Because I had been doing stuff around OpenShift AppDev and CI/CD, creating resources or custom-resources for OpenShift applications or components was not a new thing for me. But from a Kafka admin’s perspective it may be pretty hard in the first place because you both want her/him to focus on both the middleware and the platform.

As a consultant and supervisor for customers, I mostly propose the customers I work with to break down the silos by starting with the person(s) first which means: don’t say “this is not part of my business, I can not do OpenShift, Kubernetes, etc. while writing Java, Python, etc. code or dealing with middleware”. Well since infrastructure, middleware and application are closer now -because of the Cloud/Kubernetes Native Era- people who create or manage them should be more closer, which is a reflection of DevOps culture and change and this should start from personal sentience and responsibility. So in short, a Kafka administrator should learn about Openshift or Kubernetes if her/his company started to use Strimzi. She/he should learn about “kubectl” or “oc”, should learn about how a Kubernetes platform works or the Operator Framework.

Or even further, she/he should learn about GitOps (we will visit this topic later again for Strimzi:) ), writing and dealing with YAMLs, or a source control system like git. Isn’t this too much? Or is there any company that could do this DevOps transformation like a finger snap of Thanos?

DevOps transformation is tough because it is (and must be) a cultural transformation and has to start with peopleor even person-, then process, and lastly technology which most of the companies prefer to start with.

I remember a couple of customers who already implemented most of the DevOps practices but has still huge silos that are hard to break because of the organizational structure -because of the cultural structure. I remember the begging eyes of the Kafka admins or developers while we were doing a meeting about AMQ Streams on Openshift (Strimzi) asking like “isn’t there any other way to do this like traditional Kafka?” in the meetings.

Using the classic Kafka shell binaries for accessing the Strimzi Kafka cluster, of course, partially possible. But as I’ve said “partially”, the best practice to manage Strimzi is to use its custom resources and the operator framework, because this is the way to manage it in a Kubernetes Native way which is the main intention. This is not a classic “best-practice” case, because some parts of Strimzi (for example ACLs), doesn’t support two-way binding intentionally by design and architecture. So accessing to Strimzi Kafka cluster with a Kubernetes native way is vital.

Well, besides its being a part of the “transformation” to DevOps even if it is in reverse order (technology-> process-> people), I felt like these folks need a kind of “ferry” that they can use while building a “bridge” between the traditional middleware coast to Cloud Native and DevOps coast, which needs time to build because -as I’ve said again and again- it is a cultural change in the core.

Idea of a CLI for Strimzi

It was actually about 6 months ago. While I was preparing this workshop, CI/CD with Tekton in a Multi-cluster OpenShift Environment, I was surprised to see that Tekton could be both managed via custom resource definition YAMLs (kubectl/oc apply -f), or one could just use the Tekton CLI (tkn) to create, manipulate any object of Tekton itself; both would be handled by the Tekton’s operator.

So the idea evolved in my mind: why not use the same strategy for Strimzi too, and create an interface -actually, a command-line interface- which has the intention of helping traditional Kafka users (administrators, developers, system engineers) by providing a user experience that Apache Kafka has in terms of command executables that we talked about before.

A ferry ready to use, before building the bridge (or for those who don’t have any intention to build one).

For keeping everything Kubernetes/OpenShift Native and providing Strimzi/AMQ Streams users the closest and most familiar experience for accessing and managing Kafka, I started an open-source project that provides a command-line interface which creates/manipulates Strimzi custom-resources and applies them by using -very mostly- familiar parameters of traditional Kafka commands.

And I named the project Strimzi Kafka CLI.

The Metamorphosis: Strimzi Kafka CLI

With Strimzi Kafka CLI, you can create, alter, delete topics, users, manage ACLs, create, and change the configuration of the Kafka cluster, topics, users. Most importantly, you can most of these -with a few differences and additions- just like you do with Kafka shell files. Let’s see an example:

For example to create a Kafka topic with name “messages” let’s say with 24 partitions and 3 replication factors you would normally write this command:

bin/kafka-topics.sh --create --topic messages --partitions 24 --replication-factor 3 --zookeeper [zk_ip_here]:2181

It’s pretty much the same with the Strimzi Kafka CLI:

kfk topics --create --topic messages --partitions 24 --replication-factor 3 -c [strimzi_kafka_cluster_name] -n [kubernetes_namespace_for_cluster]

Please notice that the “kafka-topics.sh” command is transformed to a similar command for Strimzi as “kfk” with the “topics” option which creates the “kfk topics” command together.

Inspired by the CLI of the Tekton project, I wanted to use a three-letter main command both for which will not be hard to remember -like Tekton’s tkn– and will evoke the usage of “kafka-*.sh”.

Basically for the current version, which is 0.1.0-alpha25, the command options are like the following (We get it by running the “kfk –help” command):

kfk --help
Usage: kfk [OPTIONS] COMMAND [ARGS]...

  Strimzi Kafka CLI

Options:
  --help  Show this message and exit.

Commands:
  acls              This tool helps to manage ACLs on Kafka.
  clusters          The kafka cluster(s) to be created, altered or...
  configs           Add/Remove entity config for a topic, client, user or...
  console-consumer  The console consumer is a tool that reads data from...
  console-producer  The console producer is a tool that reads data from...
  topics            The kafka topic(s) to be created, altered or described.
  users             The kafka user(s) to be created, altered or described.
  version           Prints the version of Strimzi Kafka CLI

While having similar kinds of commands like acls, configs, console-consumer, console-producer, topics, Strimzi Kafka CLI has some additional commands like clusters, users for managing Strimzi custom resources directly, because of the concern of running the commands towards the Strimzi operator itself. I believe this will also improve the users’ adaptation of using Kafka that lives natively in Kubernetes/OpenShift context while writing the same kind of commands and almost similar options like Kafka binaries provide and learning a few objects’ management that belongs to Strimzi.

For example while one can both create an ACL for a current user with the following command which is more familiar for native Kafka users…:

kfk acls --add --allow-principal User:my-user --topic my-topic --operation describe -n kafka -c my-cluster

…the other may prefer to directly alter the user for changing its ACLs:

kfk users --alter --user my-user --add-acl --resource-type topic --resource-name my-topic --operation describe -c my-cluster -n kafka

Both commands will add the ACL to user “my-user” for the topic “my-topic” in the same way: by changing the User custom resource of Strimzi.

Strimzi Kafka CLI uses YAML examples from the original package of Strimzi, so each Strimzi Kafka CLI version uses a relevant version -usually, the latest one which is currently 0.19.0- of the Strimzi custom resource files.

Apart from this, as a dependency, Strimzi Kafka CLI uses the latest version of the kubectl binary that is downloaded regarding the operating system at the first usage. Strimzi Kafka CLI uses kubectl for accessing Kubernetes/OpenShift cluster(s) and for applying the relevant resources of Strimzi Kafka Operator.

To see the version of these external dependencies or the current version of Strimzi Kafka CLI which is being used following command should be used:

kfk version
CLI Version: 0.1.0a25
Strimzi Version: 0.19.0
Kubectl Version: v1.18.0

Strimzi Kafka CLI is currently in Alpha version since it is not feature-complete yet (but will probably be Beta in a short period of time; fingers crossed:) ).

For each version a PyPi release (since this is a Python project:) ) is created automatically -via Github actions- where anybody can install Strimzi Kafka CLI easily with pip command:

 pip install strimzi-kafka-cli

Each release creation also triggers a container image build which is tagged with the same version of the application for possible usages of using it in as a Tekton step, or any other container-native usage. Containerized versions of Strimzi Kafka CLI is located in quay.io and can be pulled with any container CLI:

docker pull quay.io/systemcraftsman/strimzi-kafka-cli:latest

or

podman pull quay.io/systemcraftsman/strimzi-kafka-cli:latest

So it is possible to get Strimzi Kafka CLI via PyPi as a binary package for direct usage or an image version of it in order to run it on in a container.

There are lots of things to tell here but I think the best way to explain something is not by telling it but by showing about it. Therefore I created this introductory video about Strimzi Kafka CLI which will be the start of a potential video series:

I hope Strimzi Kafka CLI will be useful for those who need a CLI approach to help them while being in their DevOps transformation journey and for those who want to try out a different approach.

And from an open-source developer’s perspective -and of course, as a proud Red Hatter-, I hope Strimzi community can benefit from this project at the end.

Either be a user of Strimzi Kafka CLI, or just a source-code viewer, please feel free to contribute to the project and improve it together.

So since this is about the end of the article, let’s finish it here with a memorable quote by Franz Kafka – the well-known author, whose name is given to Apache Kafka-, from one of his most famous book “The Metamorphosis”:

“As Gregor Samsa awoke one morning from uneasy dreams he found himself transformed in his bed into a gigantic insect.”

― Franz Kafka, The Metamorphosis

For me, it was first Apache Kafka. Then Kafka on Kubernetes with Strimzi. And the creation of a CLI for it. What a process of metamorphosis🙂

Take care👋

Continue reading >
Share
Page 2 of 2