All posts in " cdc "

Change Data Capture with CockroachDB and Strimzi

Dealing with data is hard in the Cloud-native era, as the cloud itself has many dynamics, and microservices have their unique data-relevant problems. As many patterns emerge after dealing with similar problems over and over, technologists invented many data integration patterns to solve those data-related problems.

Change Data Capture (CDC) is one of those data integration patterns, maybe one of the most popular ones nowadays. It enables capturing row-level changes into a configurable sink for downstream processing such as reporting, caching, full-text indexing, or most importantly helping with avoiding dual writes.

Many technologies implement CDC as either a part of their product’s solution or the main functionality of an open-source project like Debezium.

CockroachDB is one of those technologies that implement CDC as a part of their product features.

CockroachDB is a distributed database that supports standard SQL. It is designed to survive software and hardware failures, from server restarts to data center outages.

While CockroachDB is designed to be excellent, it needs to coexist with other systems like full-text search engines, analytics engines or data pipeline systems. Because of that, it has Changefeeds, which enable data sinks like AWS S3, webhooks and most importantly Apache Kafka or Strimzi: a Kafka on Kubernetes solution.

Strimzi is a CNCF sandbox project, which provides an easy way to run and manage an Apache Kafka cluster on Kubernetes or OpenShift. Strimzi is a Kubernetes Operator, and it provides an easy and flexible configuration of a Kafka cluster, empowered by the capabilities of Kubernetes/OpenShift.

In this tutorial, you will:

  • Run a Kafka cluster on OpenShift/Kubernetes.
  • Create a topic within Strimzi by using its the Strimzi CLI.
  • Create a CockroachDB cluster on OpenShift and use its SQL client.
  • Create a table on CockroachDB and configure it for using CDC.
  • Create, update, delete records in the CockroachDB table.
  • Consume the change events from the relevant Strimzi topic by using the Strimzi CLI.

Prerequisites

You’ll need the following for this tutorial:

  • oc CLI.
  • Strimzi CLI.
  • A 30-days trial license for CockroachDB, which is required to use CockroachDB’s CDC feature.
  • You must have Strimzi 0.26.1 or AMQ Streams 2.1.0 operator installed on your OpenShift/Kubernetes cluster.
  • You must have CockroachDB 2.3.0 operator installed on your OpenShift/Kubernetes cluster.

CockroachBank’s Request

Suppose that you are a consultant who works with a customer, CockroachBank LLC.

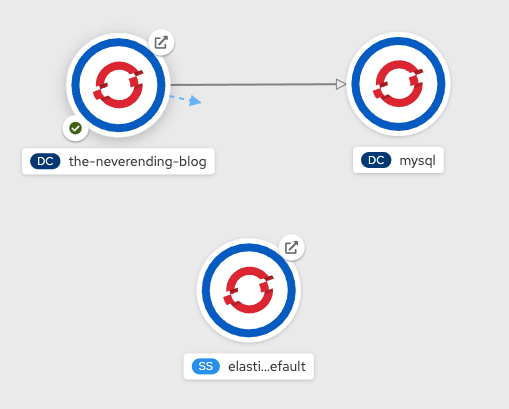
They use CockroachDB on OpenShift and their daily bank account transactions are kept in CockroachDB. Currently, they have a mechanism for indexing the bank account transaction changes in Elasticsearch but they noticed that it creates data inconsistencies between the actual data and the indexed log data that is in Elasticsearch.

They want you to create a core mechanism that avoids any data inconsistency issue between systems. They require you to create a basic implementation of a CDC by using CockroachDB’s Changefeed mechanism and because they use CockroachDB on OpenShift, they would like you to use Strimzi.

You must only implement the CDC part, so do not need to implement the Elasticsearch part. To simulate the CockroachBank system, you must install the AMQ Streams and CockroachDB operators on your OpenShift cluster and create their instances.

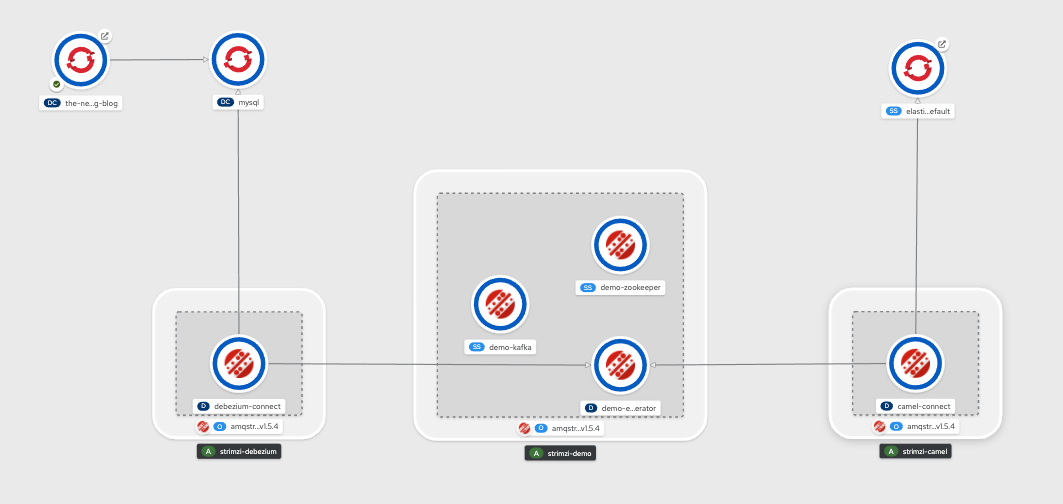
The following image is the architectural diagram of the system they require you to implement:

Required Architecture

Creating a Strimzi Cluster

To create a Strimzi cluster, you need a namespace/project created on your OpenShift/Kubernetes cluster. You can use the oc CLI to create a namespace/project.

oc new-project cockroachbank

Run the kfk command of Strimzi CLI to create a Kafka cluster with one broker. A small cluster with one broker is enough for a demo.

export STRIMZI_KAFKA_CLI_STRIMZI_VERSION=0.26.1 && \
kfk clusters --create \
--cluster my-cluster \
--replicas 1 \
--zk-replicas 1 \
-n cockroachbank -y

NOTE

You can download the Strimzi CLI Cheat Sheet from here for more information about the CLI commands.


Verify that you have all the Strimzi pods up and running in Ready state.

oc get pods -n cockroachbank

The output should be as follows:

NAME                                          READY   STATUS    ...
...output omitted...
my-cluster-entity-operator-64b8dcf7f6-cmjz8   3/3     Running   ...
my-cluster-kafka-0                            1/1     Running   ...
my-cluster-zookeeper-0                        1/1     Running   ...
...output omitted...

Running CockroachDB on OpenShift

To install CockroachDB on your OpenShift cluster, download the CockroachDB cluster custom resource, which the CockroachDB operator creates the cluster for you by using the resource definition you provide in the YAML.

The YAML content should be as follows:

kind: CrdbCluster
apiVersion: crdb.cockroachlabs.com/v1alpha1
metadata:
  name: crdb-tls-example
  namespace: cockroachbank
spec:
  cockroachDBVersion: v21.1.10
  dataStore:
    pvc:
      spec:
        accessModes:
          - ReadWriteOnce
        resources:
          requests:
            storage: 10Gi
        volumeMode: Filesystem
  nodes: 3
  tlsEnabled: false

Run the following command to apply the resource YAML on OpenShift.

oc create -f crdb-cluster.yaml -n cockroachbank

Verify that you have all the CockroachDB pods up and running in Ready state.

oc get pods -n cockroachbank

The output should be as follows:

NAME                                          READY   STATUS    ...
...output omitted...
crdb-tls-example-0                            1/1     Running   ...
crdb-tls-example-1                            1/1     Running   ...
crdb-tls-example-2                            1/1     Running   ...
...output omitted...

In another terminal run the following command to access CockroachDB SQL client interface:

oc rsh -n cockroachbank crdb-tls-example-0 cockroach sql --insecure

On the SQL client interface, run the following commands to enable the trial for enterprise usage. You must do this because CDC is a part of the Enterprise Changefeeds and you need an enterprise license. Refer to the Prerequisites part of this tutorial if you did not get a trial license yet.

SET CLUSTER SETTING cluster.organization = '_YOUR_ORGANIZATION_';
SET CLUSTER SETTING enterprise.license = '_YOUR_LICENSE_';

Creating and Configuring a CockroachDB Table

On the SQL query client terminal window, run the following command to create a database called bank on CockroachDB.

root@:26257/defaultdb> CREATE DATABASE bank;

Select the bank database to use for the rest of the actions in the query window.

root@:26257/defaultdb> USE bank;

Create a table called account with the id and balance fields.

root@:26257/bank> CREATE TABLE account (id INT PRIMARY KEY, balance INT);

Create a Changefeed for the table account. Set the Strimzi Kafka cluster broker address for the Changefeed, to specify the broker to send the captured change data:

root@:26257/bank> CREATE CHANGEFEED FOR TABLE account INTO 'kafka://my-cluster-kafka-bootstrap:9092' WITH UPDATED;

Notice that the Kafka bootstrap address is my-cluster-kafka-bootstrap:9092. This is the service URL that Strimzi provides for the Kafka cluster my-cluster you have created.


NOTE

For more information on creating a Changefeed on CockroachDB refer to this documentation page.


Leave the terminal window open for further instructions.

Creating a Strimzi Topic and Consuming Data

In another terminal window run the following command to create a topic called account:

kfk topics --create --topic account \
--partitions 1 --replication-factor 1 \
-c my-cluster -n cockroachbank

The output must be as follows:

kafkatopic.kafka.strimzi.io/account created

IMPORTANT

A topic with 1 partition and 1 replication factor is enough for this demonstration. If you have a Strimzi Kafka cluster with more than 1 broker, then you can configure your topic differently.


Notice that it is the same name as the CockroachDB table account. CockroachDB CDC produces change data into a topic with the same name as the table by default.

In the same terminal window run the following command to start consuming from the account topic:

kfk console-consumer --topic account \
-c my-cluster -n cockroachbank

Leave the terminal window open to see the consumed messages for the further steps.

Capturing the Change Event Data

In the SQL client terminal window, run the following command to insert a sample account data into the account table.

root@:26257/bank> INSERT INTO account (id, balance) VALUES (1, 1000), (2, 250), (3, 700);

This should create the following accounts in the CockroachDB account table:

id balance
1 1000
2 250
3 700

After inserting the data, verify that the Strimzi CLI consumer prints out the consumed data:

{"after": {"balance": 1000, "id": 1}, "updated": "1655075852039229718.0000000000"}
{"after": {"balance": 250, "id": 2}, "updated": "1655075852039229718.0000000000"}
{"after": {"balance": 700, "id": 3}, "updated": "1655075852039229718.0000000000"}

To observe some more event changes on the topic data, run the following queries on the SQL client to change the balance between accounts.

root@:26257/bank> UPDATE account SET balance=700 WHERE id=1;
root@:26257/bank> UPDATE account SET balance=600 WHERE id=2;
root@:26257/bank> UPDATE account SET balance=650 WHERE id=3;

Verify that the new changes, which CDC of CockroachDB captures, are printed out by the Strimzi CLI consumer. In the consumer’s terminal window, you should see a result as follows:

...output omitted...
{"after": {"balance": 700, "id": 1}, "updated": "1655075898837400914.0000000000"}
{"after": {"balance": 600, "id": 2}, "updated": "1655075904775509980.0000000000"}
{"after": {"balance": 650, "id": 3}, "updated": "1655075910511670876.0000000000"}

Notice the balance changes that represent a transaction history in the consumer output.

As the last step, delete the bank account to see how CockroachDB CDC captures them. Run the following SQL query in the query console of CockroachDB:

root@:26257/bank> DELETE FROM account where id <> 0;

The Strimzi CLI consumer should print the following captured events:

...output omitted...
{"after": null, "updated": "1655075949177132715.0000000000"}

Notice that the after field becomes null when the change data is a delete event.

Congratulations! You’ve successfully captured the bank account transaction changes, and streamed them as change events via Strimzi.

Conclusion

In this tutorial, you have learned how to run a Kafka cluster on OpenShift by using Strimzi, and how to create a topic by using the Strimzi CLI. Also, you have learned to install CockroachDB on OpenShift, create a table by using its SQL query interface, and configure it for using CDC. You’ve created change events on a CockroachDB table and consumed those events from the Strimzi Kafka topic by using the Strimzi CLI.

You can find the resources for this tutorial in this repository.

Continue reading >
Share

ASAP! – The Storified Demo of Introduction to Debezium and Kafka on Kubernetes

A few days ago, I had a chance to speak about “Change Data Capture with Debezium and Apache Kafka” at an Istanbul Java User Group event. After the presentation, I did a small demo that I think was very beneficial for the audience so I thought that it would be best to improve it and kind of “storify” it in order to have both fun and spread it to a wider audience. So here is the demo, and here are the resources that you might need. Enjoy:)

Prerequisites

Install the required tools

  • Strimzi Kafka CLI:

sudo pip install strimzi-kafka-cli

  • oc or kubectl
  • helm

Login to a Kubernetes or OpenShift cluster and create a new namespace/project.

Let’s say we create a namespace called debezium-demo by running the following command on OpenShift:

oc new-project debezium-demo

Install demo application ‘The NeverEnding Blog’

Clone the repository:

git clone https://github.com/mabulgu/the-neverending-blog.git> Checkout the debezium-demo branch:

git checkout debezium-demo

Go into the application directory:

cd the-neverending-blog

Install the helm template:

helm template the-neverending-blog chart | oc apply -f - -n debezium-demo

Start the s2i build for the application:

oc start-build neverending-blog --from-dir=. -n debezium-demo

…and OpenShift will take care of the rest and you should have a blog application called ‘The NeverEnding Blog’ in the end:

Install Elasticsearch

Apply Elasticsearch resources to OpenShift:

oc apply -f resources/elasticsearch.yaml -n debezium-demo

Expose the route for Elasticsearch:

oc expose svc elasticsearch-es-http -n debezium-demo

By clicking on the route of the application in the browser you should see a page like this:

And for the overall applications before the demo you should be having something like this (OpenShift Developer Perspective is used here):

So you should have a Django application which uses a MySQL database and an Elasticsearch that has no data connection to the application -yet:)

ASAP!

So you are working at a company called NeverEnding Inc. as a Software Person and you are responsible for the company’s blog application which runs on Django and use MYSQL as a database.

One day your boss comes and tells you this:

So getting the command from your boss, you think that this is a good use case for using Change Data Capture (CDC) pattern.

Since the boss wants it ASAP, and you don’t want to make dual writes which may cause consistency problems, you have to find a way to apply this request easily and you think it will be best to implement it via Debezium on your OpenShift Office Space cluster along with Strimzi: Kafka on Kubernetes.

Oh, you can wear a Hawaiian shirt and jeans while you are doing all these even if it’s not Friday:)

Deploying a Kafka cluster with Strimzi Kafka CLI

In order to install Strimzi cluster on OpenShift you decide to use Strimzi Kafka CLI which you can also install the cluster operator of it.

First install the Strimzi operator:

kfk operator --install -n debezium-demo

IMPORTANT

If you have already an operator installed, please check the version. If the Strimzi version you’ve been using is older than 0.20.0, you have to set the right version as an environment variable, so that you will be able to use the right version of cluster custom resource.

export STRIMZI_KAFKA_CLI_STRIMZI_VERSION=0.19.0

Let’s create a Kafka cluster called demo on our OpenShift namespace debezium-demo.

kfk clusters --create --cluster demo -n debezium-demo

In the opened editor you may choose 3 broker, 3 zookeeper configuration which is the default. So after saving the configuration file of the Kafka cluster in the developer preview of OpenShift you should see the resources that are created for the Kafka cluster:

Deploying a Kafka Connect Cluster for Debezium

Now it’s time to create a Kafka Connect cluster via using Strimzi custom resources. Since Strimzi Kafka CLI is not capable of creating connect objects yet at the time of writing this article we will create it by using the sample resources in the demo project.

Create a custom resource like the following:

apiVersion: kafka.strimzi.io/v1beta1
kind: KafkaConnect
metadata:
  annotations:
    strimzi.io/use-connector-resources: 'true'
  name: debezium
spec:
  bootstrapServers: 'demo-kafka-bootstrap:9092'
  config:
    config.storage.replication.factor: '1'
    config.storage.topic: debezium-cluster-configs
    group.id: debezium-cluster
    offset.storage.replication.factor: '1'
    offset.storage.topic: debezium-cluster-offsets
    status.storage.replication.factor: '1'
    status.storage.topic: debezium-cluster-status
  image: 'quay.io/hguerreroo/rhi-cdc-connect:2020-Q3'
  jvmOptions:
    gcLoggingEnabled: false
  replicas: 1
  resources:
    limits:
      memory: 2Gi
    requests:
      memory: 2Gi

And apply it to OpenShift debezium-demo namespace (or just apply the one you have in this demo repository)

oc apply -f resources/kafka-connect-debezium.yaml -n debezium-demo

This will create a Kafka Connect cluster with the name debezium on your namespace:

Deploy a Debezium connector for MySQL

So you have the Kafka Connect cluster to be able to use with Debezium. Now it’s time for the real magic; the Debezium connector for MySQL.

Create the custom resource like the following, by noticing the parts of configuration starts with database.

Since you have to capture the changes in the neverendingblog database which has the posts database your configuration should be something like this:

apiVersion: kafka.strimzi.io/v1alpha1
kind: KafkaConnector
metadata:
  labels:
    strimzi.io/cluster: debezium
  name: debezium-mysql-connector
spec:
  class: io.debezium.connector.mysql.MySqlConnector
  config:
    database.server.name: db
    database.hostname: mysql
    database.user: debezium
    database.password: dbz
    database.server.id: '184054'
    database.port: '3306'
    database.dbname: neverendingblog
    database.history.kafka.topic: db.history
    database.history.kafka.bootstrap.servers: 'demo-kafka-bootstrap:9092'
  tasksMax: 1

Apply this YAML by saving it or just run the following command in this repository:

oc apply -f resources/kafka-connector-mysql-debezium.yaml -n debezium-demo

So you should now have some action in your Kafka cluster by now and the big picture should look like this:

In order to see if there is any new topic is created in your Kafka cluster run this command to list the topics in the debezium-demo namespace and demo Kafka cluster:

kfk topics --list -n debezium-demo -c demo

So you should see some topics are created for you:

NAME                                                                                PARTITIONS   REPLICATION FACTOR
consumer-offsets---84e7a678d08f4bd226872e5cdd4eb527fadc1c6a                         50           1
db                                                                                  1            1
db.history                                                                          1            1
db.neverendingblog.auth-permission---68ff3df4ec8e6a44b01288a87974b27990a559d2       1            1
db.neverendingblog.auth-user---a76d163ac9b98b60f06bfda76e966523ee9ffad              1            1
db.neverendingblog.django-admin-log---889a02bc079f08f8adf60c1b1f1cc6782dd99531      1            1
db.neverendingblog.django-content-type---79cc865eac5ac5b439174d2165a8035d52062610   1            1
db.neverendingblog.django-migrations---adc510d5c63e7b6ccbbf460dfa8c03408559591d     1            1
db.neverendingblog.django-session---38f5de04ea83f7a9add8be00a2d695a9503505c6        1            1
db.neverendingblog.posts                                                            1            1
debezium-cluster-configs                                                            1            1
debezium-cluster-offsets                                                            25           1
debezium-cluster-status                                                             5            1

Now let’s check this connector works or not. So start a consumer that listens your db.neverendingblog.posts topic which the captured data from posts topic is put.

kfk console-consumer --topic db.neverendingblog.posts -n debezium-demo -c demo

After starting the consumer let’s make some changes in the NeverEnding Blog. Open the Django admin page by getting the route URL of the blog and putting a “/admin” at the end.


INFO

You can get the route URL of your application with the following command:

oc get routes -n debezium-demo

So login to the admin page with the credentials mabulgu/123456 and click on Posts and add a new one by clicking Add Post and put these values as a test and save it:

In the consumer you must already have seen a move right? Copy that into a JSON beautifier and see what you have. You must have something like this:

{
  "schema": {
    "type": "struct",
    "fields": [
      {
        "type": "struct",
        "fields": [
          {
            "type": "int32",
            "optional": false,
            "field": "id"
          },
          {
            "type": "string",
            "optional": false,
            "field": "title"
          },
          {
            "type": "string",
            "optional": false,
            "field": "text"
          },
          {
            "type": "int64",
            "optional": false,
            "name": "io.debezium.time.MicroTimestamp",
            "version": 1,
            "field": "created_date"
          },
          {
            "type": "int64",
            "optional": true,
            "name": "io.debezium.time.MicroTimestamp",
            "version": 1,
            "field": "published_date"
          },
          {
            "type": "int32",
            "optional": false,
            "field": "author_id"
          }
        ],
        "optional": true,
        "name": "db.neverendingblog.posts.Value",
        "field": "before"
      },
      {
        "type": "struct",
        "fields": [
          {
            "type": "int32",
            "optional": false,
            "field": "id"
          },
          {
            "type": "string",
            "optional": false,
            "field": "title"
          },
          {
            "type": "string",
            "optional": false,
            "field": "text"
          },
          {
            "type": "int64",
            "optional": false,
            "name": "io.debezium.time.MicroTimestamp",
            "version": 1,
            "field": "created_date"
          },
          {
            "type": "int64",
            "optional": true,
            "name": "io.debezium.time.MicroTimestamp",
            "version": 1,
            "field": "published_date"
          },
          {
            "type": "int32",
            "optional": false,
            "field": "author_id"
          }
        ],
        "optional": true,
        "name": "db.neverendingblog.posts.Value",
        "field": "after"
      },
      {
        "type": "struct",
        "fields": [
          {
            "type": "string",
            "optional": false,
            "field": "version"
          },
          {
            "type": "string",
            "optional": false,
            "field": "connector"
          },
          {
            "type": "string",
            "optional": false,
            "field": "name"
          },
          {
            "type": "int64",
            "optional": false,
            "field": "ts_ms"
          },
          {
            "type": "string",
            "optional": true,
            "name": "io.debezium.data.Enum",
            "version": 1,
            "parameters": {
              "allowed": "true,last,false"
            },
            "default": "false",
            "field": "snapshot"
          },
          {
            "type": "string",
            "optional": false,
            "field": "db"
          },
          {
            "type": "string",
            "optional": true,
            "field": "table"
          },
          {
            "type": "int64",
            "optional": false,
            "field": "server_id"
          },
          {
            "type": "string",
            "optional": true,
            "field": "gtid"
          },
          {
            "type": "string",
            "optional": false,
            "field": "file"
          },
          {
            "type": "int64",
            "optional": false,
            "field": "pos"
          },
          {
            "type": "int32",
            "optional": false,
            "field": "row"
          },
          {
            "type": "int64",
            "optional": true,
            "field": "thread"
          },
          {
            "type": "string",
            "optional": true,
            "field": "query"
          }
        ],
        "optional": false,
        "name": "io.debezium.connector.mysql.Source",
        "field": "source"
      },
      {
        "type": "string",
        "optional": false,
        "field": "op"
      },
      {
        "type": "int64",
        "optional": true,
        "field": "ts_ms"
      },
      {
        "type": "struct",
        "fields": [
          {
            "type": "string",
            "optional": false,
            "field": "id"
          },
          {
            "type": "int64",
            "optional": false,
            "field": "total_order"
          },
          {
            "type": "int64",
            "optional": false,
            "field": "data_collection_order"
          }
        ],
        "optional": true,
        "field": "transaction"
      }
    ],
    "optional": false,
    "name": "db.neverendingblog.posts.Envelope"
  },
  "payload": {
    "before": null,
    "after": {
      "id": 3,
      "title": "Javaday Istanbul 2020",
      "text": "It was perfect as always!",
      "created_date": 1606400139000000,
      "published_date": null,
      "author_id": 1
    },
    "source": {
      "version": "1.2.4.Final-redhat-00001",
      "connector": "mysql",
      "name": "db",
      "ts_ms": 1606400180000,
      "snapshot": "false",
      "db": "neverendingblog",
      "table": "posts",
      "server_id": 223344,
      "gtid": null,
      "file": "mysql-bin.000003",
      "pos": 27078,
      "row": 0,
      "thread": 221,
      "query": null
    },
    "op": "c",
    "ts_ms": 1606400180703,
    "transaction": null
  }
}

So congratulations! You can capture changes on your neverendingblog database.

But your boss still wants you to put these changes on your search system Elasticsearch.

Before rolling the sleeves to send this change data to Elasticsearch let’s purify this data since all you need to index is the operation type and the table fields in this Debezium JSON data.

Simple Data Transformation

So in order to transform the data some key/value converters has to be set in order to do extract transformation which will create a different data model in the end.

So add these lines and apply it on your OpenShift cluster:

    key.converter: org.apache.kafka.connect.json.JsonConverter
    key.converter.schemas.enable: 'false'
    value.converter: org.apache.kafka.connect.json.JsonConverter
    value.converter.schemas.enable: 'false'
    transforms: extract
    transforms.extract.add.fields: 'op,table'
    transforms.extract.type: io.debezium.transforms.ExtractNewRecordState

Or just run this sample in the repository:

oc apply -f resources/kafka-connector-mysql-debezium_transformed.yaml -n debezium-demo

This means that we will extract the data for op and table fields and create a new JSON to be returned.

After applying the changes let’s consume the messages again if we did stop the consumer already:

kfk console-consumer --topic db.neverendingblog.posts -n debezium-demo -c demo

Go to the blog admin page again but this time let’s change one of the blog posts instead of adding one.

Edit the post titled Strimzi Kafka CLI: Managing Strimzi in a Kafka Native Way and put a “CHANGED -” at the very start of the body for example.

When you change the data, a relatively smaller JSON data must have been consumed in your console, something like this:

{
  "id": 2,
  "title": "Strimzi Kafka CLI: Managing Strimzi in a Kafka Native Way",
  "text": "CHANGED - Strimzi Kafka CLI is a CLI that helps traditional Apache Kafka users -mostly administrators- to easily adapt Strimzi, a Kubernetes operator for Apache Kafka.\r\n\r\nIntention here is to ramp up Strimzi usage by creating a similar CLI experience with traditional Apache Kafka binaries. \r\n\r\nkfk command stands for the usual kafka-* prefix of the Apache Kafka runnable files which are located in bin directory. There are options provided like topics, console-consumer, etc. which also mostly stand for the rest of the runnable file names like kafka-topic.sh.\r\n\r\nHowever, because of the nature of Strimzi and its capabilities, there are also unusual options like clusters which is used for cluster configuration or users which is used for user management and configuration.",
  "created_date": 1594644431000000,
  "published_date": 1594644489000000,
  "author_id": 1,
  "__op": "u",
  "__table": "posts"
}

So this will be the data that you will index in Elasticsearch. Now let’s go for it!

Deploying a Kafka Connect Cluster for Camel

In order to use another connector that consumes the data from Kafka and puts it onto Elasticsearch, first we need another Kafka Connect cluster, this time for a Camel connector.

apiVersion: kafka.strimzi.io/v1beta1
kind: KafkaConnect
metadata:
  annotations:
    strimzi.io/use-connector-resources: 'true'
  name: camel
spec:
  bootstrapServers: 'demo-kafka-bootstrap:9092'
  config:
    config.storage.replication.factor: '1'
    config.storage.topic: camel-cluster-configs
    group.id: camel-cluster
    offset.storage.replication.factor: '1'
    offset.storage.topic: camel-cluster-offsets
    status.storage.replication.factor: '1'
    status.storage.topic: camel-cluster-status
  image: 'quay.io/hguerreroo/camel-kafka-connect:0.5.0'
  jvmOptions:
    gcLoggingEnabled: false
  replicas: 1
  resources:
    limits:
      memory: 2Gi
    requests:
      memory: 2Gi

Saving or apply this YAML to your OpenShift namespace or just simply run this sample:

oc apply -f resources/kafka-connect-camel.yaml -n debezium-demo

This will create a Kafka Connect cluster with the name camel on your namespace:

Now let’s put some connector on this connect cluster.

Deploy a Camel Sink connector for Elasticsearch

In order to send the consumed data to Elasticsearch we can use Apache Camel project’s connectors for Kafka Connect.

The following is a sample of an Elasticsearch Sink Connector of Camel, which takes Kafka as the source and Elasticsearch as the sink.

apiVersion: kafka.strimzi.io/v1alpha1
kind: KafkaConnector
metadata:
  labels:
    strimzi.io/cluster: camel
  name: elasticsearch-connector
spec:
  class: >-
    org.apache.camel.kafkaconnector.elasticsearchrest.CamelElasticsearchrestSinkConnector
  config:
    camel.sink.endpoint.hostAddresses: 'elasticsearch-es-http:9200'
    camel.sink.endpoint.indexName: posts
    camel.sink.endpoint.operation: Index
    camel.sink.path.clusterName: elasticsearch
    key.converter: org.apache.kafka.connect.storage.StringConverter
    value.converter: org.apache.kafka.connect.storage.StringConverter
    topics: db.neverendingblog.posts
  tasksMax: 1

By saving and applying this resource you tell the connect cluster that consume the db.neverendingblog.posts topic of Kafka, and put them in a posts index in Elasticsearch.

Or just run this command to create the connector:

oc apply -f resources/kafka-connector-elastic-camel.yaml -n debezium-demo

Now the big picture should look like this:

So let’s test your Elasticsearch running some curls as a search request.

Try out Elasticsearch

For Elasticsearch, just like other applications in OpenShift in order to access it externally, you should get its route with the command:

oc get routes -n debezium-demo

Let’s say that we get the route as http://elasticsearch-es-http-debezium-demo.apps.cluster-jdayist-6d29.jdayist-6d29.example.opentlc.com.

So in order to see if the index is created or if it has anything inside, just run the following command for searching everything in the index:

curl -X GET \
  http://elasticsearch-es-http-debezium-demo.apps.cluster-jdayist-6d29.jdayist-6d29.example.opentlc.com/posts/_search

You should get a response that has all the changes including the one for Javaday Istanbul. So let’s see if we can find it or not:

curl -X GET \
  'http://elasticsearch-es-http-debezium-demo.apps.cluster-jdayist-6d29.jdayist-6d29.example.opentlc.com/posts/_search?q=title:Javaday%20Istanbul%202020'

So you should see somethinhg like this in return:

{
    "took": 8,
    "timed_out": false,
    "_shards": {
        "total": 1,
        "successful": 1,
        "skipped": 0,
        "failed": 0
    },
    "hits": {
        "total": {
            "value": 1,
            "relation": "eq"
        },
        "max_score": 4.852654,
        "hits": [
            {
                "_index": "posts",
                "_type": "_doc",
                "_id": "8VI-FnYBP8VChxowl2Pr",
                "_score": 4.852654,
                "_source": {
                    "id": 3,
                    "title": "Javaday Istanbul 2020",
                    "text": "It was perfect as always!",
                    "created_date": 1606690949000000,
                    "published_date": null,
                    "author_id": 1,
                    "__op": "c",
                    "__table": "posts"
                }
            }
        ]
    }
}

Congratulations! You finished it ASAP! Now you can relax and may feel a little bit like a gansta:)

By the way, if you are interested in the event presentation and the demo video, here it is! (p.s. Event was in Turkish)

Continue reading >
Share